

How to Tie a Bow Tie: A Simple Step-by-Step Guide
The self-tie bow tie is a definitive mark of personal style. Yet, its intricate appearance can be intimidating, leading many to opt for the simplicity of a pre-tied version. The art of learning how to tie a bow tie is not about mastering a complicated knot; it is about embracing a timeless ritual. It is a skill that separates the discerning from the crowd, adding a layer of authentic sophistication to any formal attire.
This guide demystifies the process entirely. We provide a simple, step-by-step method designed for absolute clarity and precision. Each movement is clearly illustrated, engineered to help you achieve a neat, symmetrical result on your first attempt. Forget the fear of a crooked or messy knot. Our instructions are direct and efficient, ensuring you can prepare for any event with confidence and composure, even when time is limited.
Prepare to master a classic skill. By the end of this guide, you will not only understand the fundamental steps but also possess the quiet confidence that comes from a perfectly tied bow tie. Achieve a look that is polished, intentional, and a true reflection of refined taste.
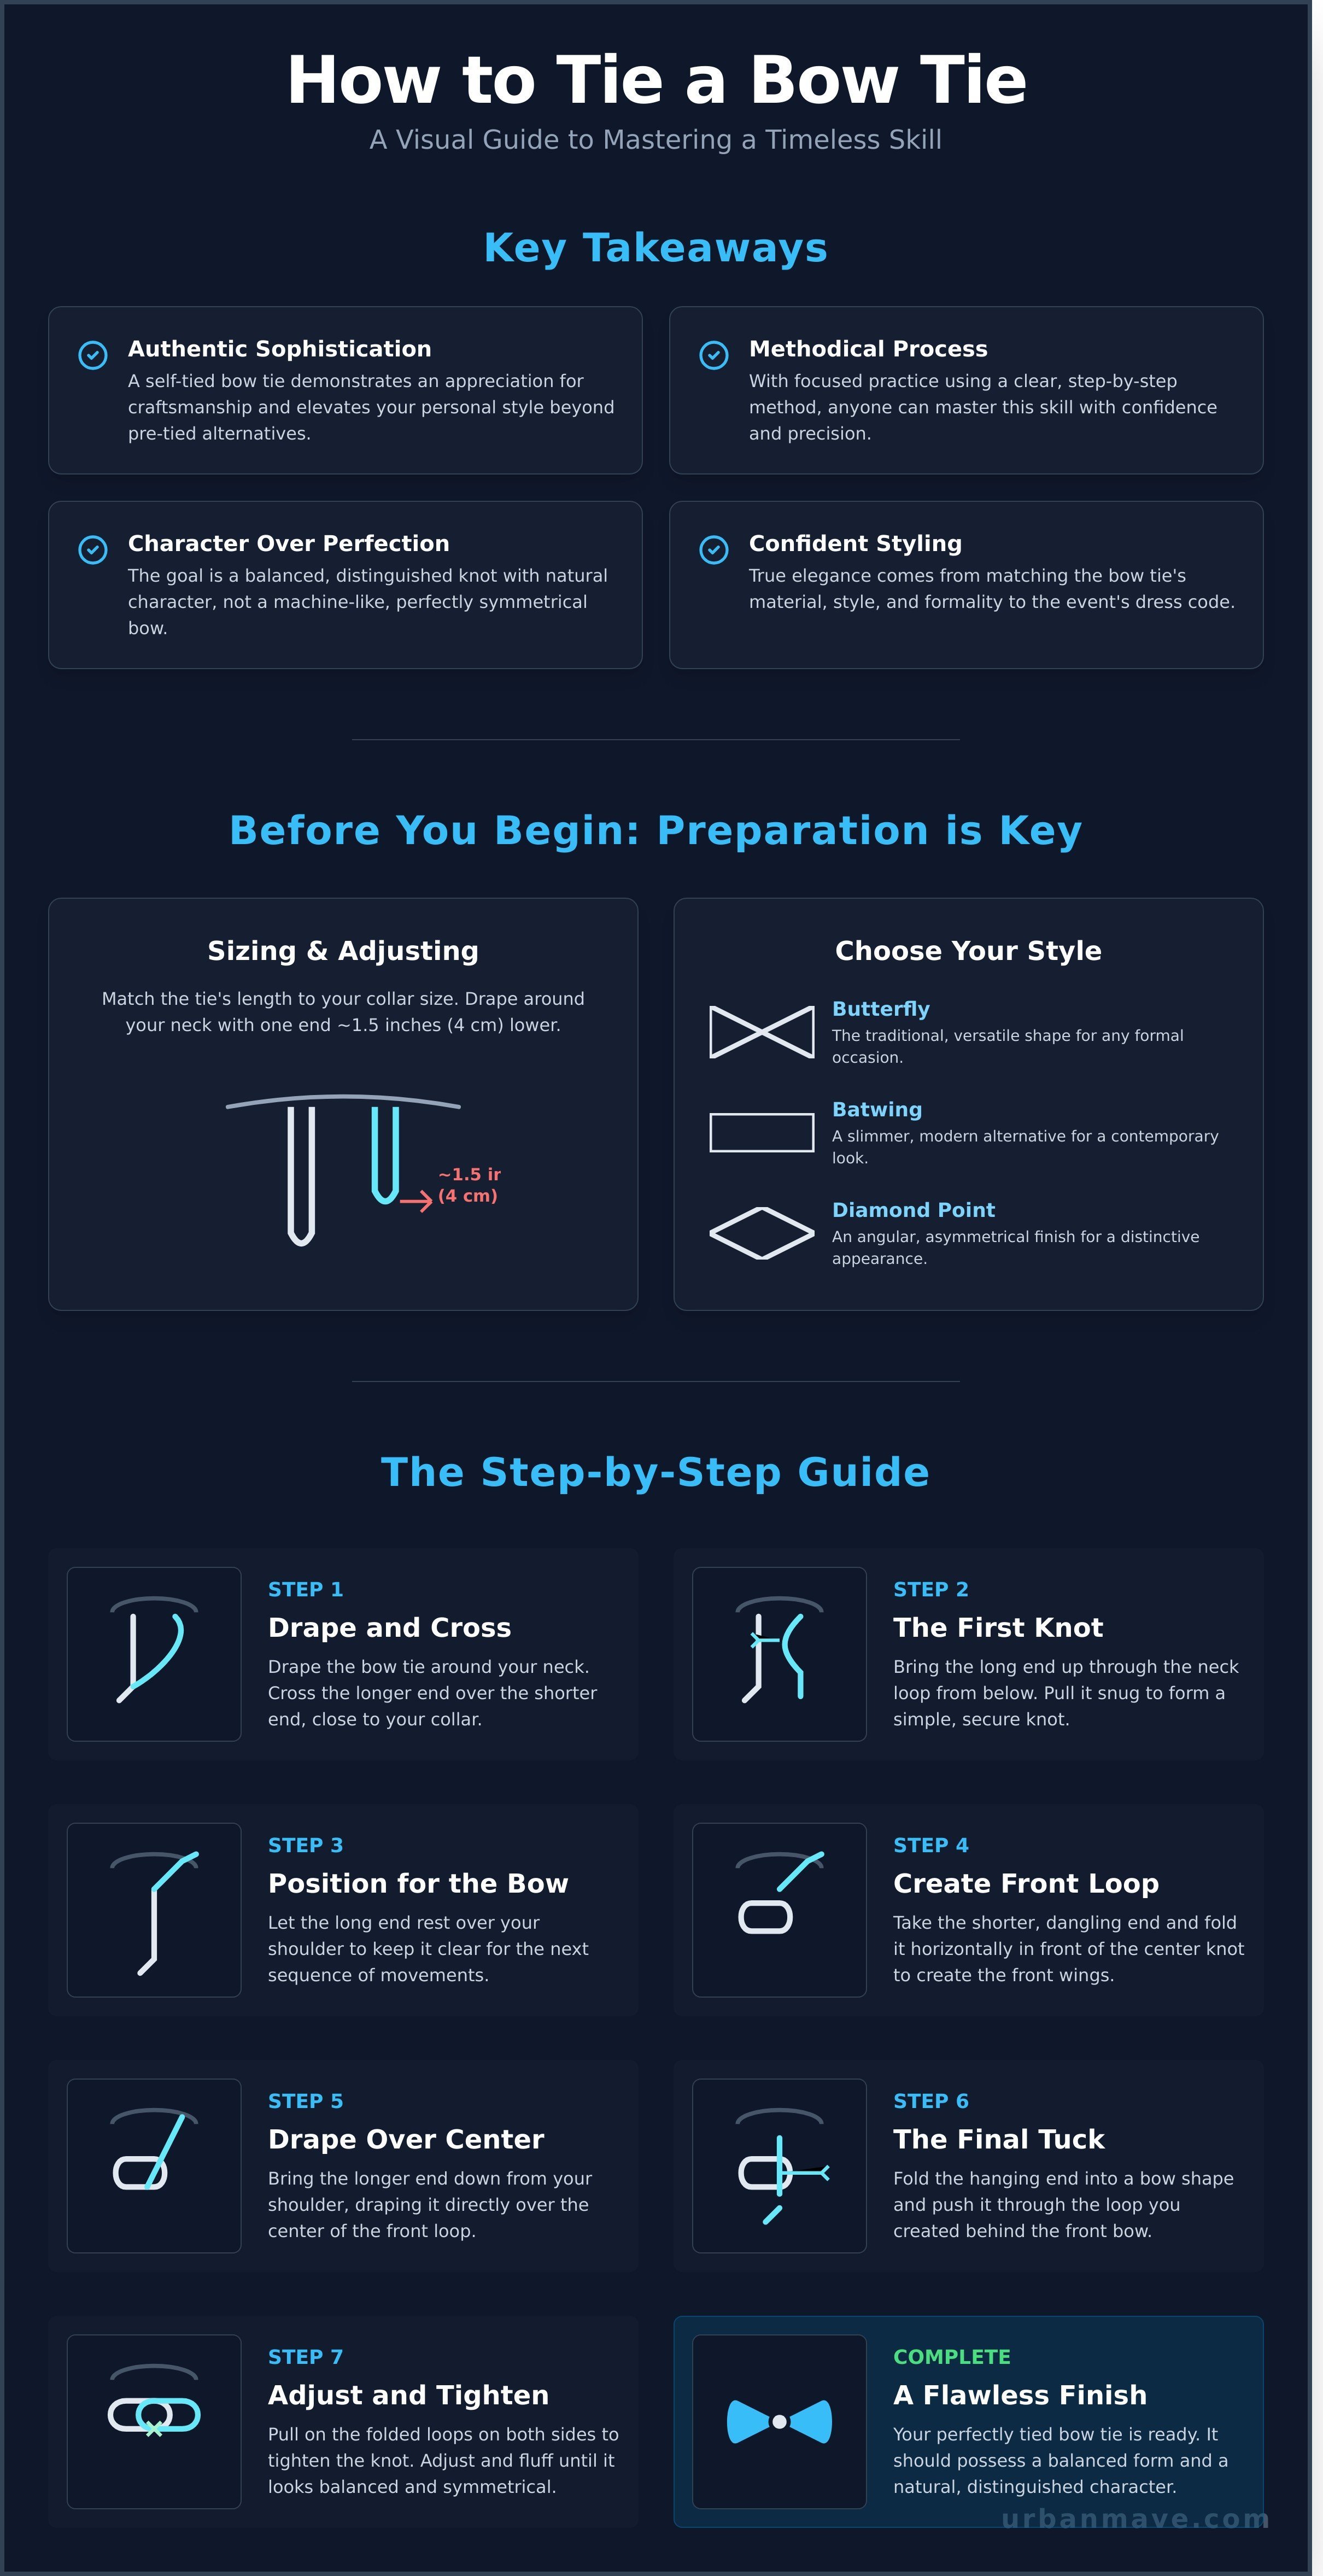
Key Takeaways
- A self-tied bow tie conveys sophistication. Its authentic knot demonstrates an appreciation for true craftsmanship.
- Our guide provides a clear, methodical process to learn how to tie a bow tie with focused practice.
- The objective is not machine-like precision. A perfectly tied bow tie possesses a balanced form and a natural, distinguished character.
- Beyond the knot, true elegance lies in confident styling. Match your bow tie's material and formality to the event's dress code.
Before You Begin: Preparing for the Perfect Knot
A self-tie bow tie is a statement of intent. Unlike its pre-tied counterpart, a hand-tied knot possesses authentic character and a subtle, pleasing asymmetry. It demonstrates an appreciation for detail and a mastery of classic style. Learning how to tie a bow tie is an investment in your personal presentation, elevating your look with a sophisticated, personal touch.
This video provides a clear visual guide to the fundamental steps.
Before you begin the knotting process, it is essential to understand the basic anatomy of your bow tie. It is composed of two flared ends, known as the leaves, connected by a narrow band called the neck. This band includes an adjuster to ensure a precise fit, a critical element for a well-proportioned final knot.
Choosing the Right Bow Tie
Your choice of bow tie sets the tone for your entire ensemble. The material and style should align with the formality of the occasion. These elements have evolved significantly throughout the history of the bow tie, providing a diverse range of options for the modern wardrobe.
- Material: Silk is the timeless choice for formal events, offering a classic sheen. Velvet adds texture and depth, ideal for evening wear. Knit and cotton ties provide a more casual, contemporary feel.
- Style: The Butterfly is the traditional, versatile shape. The Batwing is a slimmer, more modern alternative. For a distinctive look, the Diamond Point offers an angular, asymmetrical finish.
- Occasion: A black silk bow tie is non-negotiable for black-tie dress codes. Patterns, prints, and textured materials are excellent for creative events, weddings, or daily wear.
Sizing and Adjusting Your Bow Tie
Correct sizing is the most important preparatory step. An improperly adjusted bow tie will produce a flawed or unbalanced knot. The objective is to match the tie's length directly to your shirt's collar size.
Begin by locating the slider and clasp on the neckband. Adjust the band until the indicator aligns with your collar measurement (e.g., 16 inches). Drape the bow tie around your neck with your collar up. To create the necessary length for tying, ensure one end hangs approximately 1.5 inches (4 cm) lower than the other. This deliberate imbalance is the key to a successful knot.
The Step-by-Step Guide to Tying a Bow Tie
Mastering how to tie a bow tie is a skill that defines a sophisticated personal style. The process is methodical and requires precision. We recommend practicing in front of a mirror to refine your technique before any formal event. The goal is not just a knot, but a perfectly symmetrical and secure bow that appears effortlessly elegant. For further visual guidance, the step-by-step instructions from The Knot offer a reliable reference for formalwear preparation.
Step 1-3: Creating the Foundation
This initial phase establishes the structure for the knot. Each movement should be deliberate and precise. A proper foundation ensures a balanced final result.
- 1. Drape and Cross: Position the bow tie around your neck, under the collar. Adjust one end to be approximately 4cm longer than the other. Cross the longer end over the shorter end.
- 2. The First Knot: Bring the long end up through the neck loop from below. Pull it snug against your collar, forming a simple, secure knot.
- 3. Position for the Bow: Allow the long end to rest over your shoulder. This keeps it clear for the next sequence of movements.
Step 4-6: Forming the Bow Shape
Here, the recognizable shape of the bow begins to form. Maintain a firm but gentle grip to control the fabric and guide it into place.
- 4. Create the Front Loop: Take the shorter, dangling end and fold it horizontally in front of the center knot. This creates the front wings of the bow.
- 5. Drape Over the Center: Bring the longer end down from your shoulder. Drape it directly over the center of the front loop you just created.
- 6. Secure the Shape: Pinch the folded front loop and the draped-over long end together with your thumb and forefinger. This holds the structure in place.
Step 7-9: The Final Tuck and Tighten
The final movement is a precise tuck that completes the knot. This is the critical step in learning how to tie a bow tie correctly.
- 7. The Final Tuck: Identify the loop that has formed behind the front bow shape. Feed the center of the long end through this hidden loop.
- 8. Form the Back Loop: Push the fabric through, but do not pull it all the way. This action forms the back half of the bow, creating a folded end that mirrors the front.
- 9. Adjust and Perfect: Gently pull on the folded ends of the bow to tighten the knot. Adjust each side to ensure symmetry and a crisp, clean finish. The final knot should be secure.
Achieving a Flawless Finish: Troubleshooting and Refinements
Mastering how to tie a bow tie is an art of refinement, not a pursuit of machine-like symmetry. The goal is a balanced, confident knot that possesses character. A slight asymmetry or a gentle fold in the silk is not a flaw; it is the mark of an authentic, self-tied bow. The most common frustrations arise from small, correctable errors. With precise adjustments, a disordered knot transforms into a sophisticated statement.
Focus on achieving a neat, yet natural, appearance. The following steps will help you troubleshoot and perfect the final details.
How to Fix a Lopsided Bow
Symmetry is achieved through subtle adjustments. Gently tug opposing loops and ends to balance the shape. For more precise control, remember this simple mechanic: pulling the front right loop and the back left loop will tighten the knot. Conversely, pulling the front left loop and the back right loop will loosen it, allowing for easy repositioning. Work slowly until the bow is balanced to your satisfaction.
Common Mistakes to Avoid
A few common missteps can complicate the process. By avoiding them, you ensure a smoother experience and a superior result. Pay close attention to these details during the tying process:
- Over-tightening the initial knot. A knot that is too firm around the collar restricts movement and makes the final adjustments nearly impossible.
- Incorrect loop size. Creating a front loop that is too large or small will result in an unbalanced bow. Aim for a loop that is proportional to the final desired size.
- Pulling the final loop completely through. The final step involves pulling a bight (a folded section) of the fabric through, not the entire end. Pulling the end through will simply untie the knot.
Creating the 'Perfect' Dimple
The slight dimples and crisp folds in the loops are the signature of a well-tied bow. Resist the urge to flatten them out. These details distinguish your authentic knot from a flat, lifeless pre-tied version. After tightening the knot, use your fingertips to gently shape and define the loops, enhancing their character. This final touch is what elevates the entire look from simply correct to truly elegant. Explore our collection of timeless accessories.
Beyond the Knot: Styling Your Bow Tie
Mastering how to tie a bow tie is a skill. Wearing it with confidence is an art. A bow tie is a deliberate choice, a detail that signals an appreciation for timeless style and precision. The perfect knot is only the beginning; its true impact is realized when it harmonizes with the occasion, your suit, and your personal aesthetic.
The goal is not to draw attention, but to command respect through quiet sophistication. A well-chosen bow tie complements your attire, reflecting an understanding of established conventions while allowing for considered personal expression. It is a final, defining touch.
For Black Tie and Formal Events
The black-tie dress code is a study in precision, leaving little room for interpretation. The bow tie is its focal point, and adherence to tradition is paramount.
- The Standard: A self-tied, black silk bow tie in a classic butterfly shape is non-negotiable. Its subtle sheen is the correct complement to a tuxedo's lapels.
- The Pairing: It must be worn with a well-fitted tuxedo and a crisp, white tuxedo shirt. Anything less compromises the integrity of the entire look.
- The Proportion: For a balanced silhouette, the width of your finished bow should align with the outer points of your collar and not extend beyond the width of your jaw.
For Weddings and Smart Casual Occasions
Less formal events provide an opportunity to introduce texture, color, and character. Here, the bow tie becomes a refined statement of personal style, guided by the principles of balance and quality.
- Material Choice: Experiment with materials that add depth and suit the season. Quality wool, linen, or knit cotton offer a contemporary and tactile alternative to silk.
- Pattern and Color: A subtle pattern or a muted color can add individuality. The design should complement your suit or jacket, not compete with it.
- Modern Shapes: While the butterfly remains a classic, a smaller batwing style provides a modern, understated line that works well with slimmer lapels.
Ultimately, a bow tie is a testament to the man who values craft and detail. It is a quiet statement of confidence, built on an understanding that true style lies in the precise execution of timeless design.
Mastering the Knot: A Final Note on Style
The art of the bow tie is a skill of precision and patience. You now possess the complete knowledge for how to tie a bow tie with confidence. Remember that mastery comes from practice, and the final, distinguished look is a direct reflection of your attention to detail. A perfectly tied bow is a timeless expression of personal style and refinement.
True elegance is founded on craftsmanship. This applies to your knot and to your attire. At Urban Mave, we are dedicated to this principle, offering a curated selection of sophisticated apparel. Our focus is on quality materials and timeless designs, built for a modern lifestyle where every detail matters.
Complete your look with a piece that reflects your commitment to quality. Discover the curated collection of formal wear at Urban Mave. Embrace this classic skill. Wear it with confidence.
Frequently Asked Questions
What is the main difference between a self-tie and a pre-tied bow tie?
A self-tie bow tie requires you to tie the knot yourself. This process creates a unique, slightly asymmetrical knot that signals authenticity and attention to detail. A pre-tied bow tie has a permanent, factory-made knot and attaches with a strap. While convenient, it lacks the distinct character and sophisticated charm of a hand-tied bow. The choice reflects a commitment to classic, personal style and true craftsmanship.
How tight should a bow tie be around my neck?
A bow tie should rest comfortably against your collar. The fit is precise: snug enough to stay in place, yet loose enough to avoid constriction. A reliable method is the two-finger test. If you can comfortably slide two fingers between the band and your neck, the tension is correct. This ensures a sharp appearance and comfort throughout the event. The goal is effortless elegance, not discomfort.
Can I tie a bow tie on someone else using this method?
Yes, the fundamental steps remain the same. However, you must mentally reverse the instructions, as you will be creating the knot from a mirrored perspective. For greater precision and ease, it is best to stand behind the person and work over their shoulder. This approach minimizes confusion and helps achieve a clean, well-formed knot. Patience and a steady hand are key to achieving a perfect result for them.
How long does it take to learn how to tie a bow tie?
Mastering any skill requires patience and practice. For most, learning how to tie a bow tie takes approximately 15 to 30 minutes of focused effort. We recommend practicing a few times in front of a mirror until the motions become second nature. Repetition builds muscle memory, transforming the process from a challenge into a simple, refined part of your routine. This initial investment of time yields a timeless skill.
What kind of shirt collar works best with a bow tie?
The shirt collar frames the bow tie. For formal occasions, a wingtip collar is the classic choice, designed specifically to showcase the bow. For business or smart-casual settings, a medium spread or point collar provides the ideal balance, allowing the bow's wings to rest neatly under the collar points. We advise against button-down collars, as the buttons disrupt the clean, elegant line that a quality bow tie creates.
How do I properly clean and store my silk or velvet bow ties?
Quality materials demand proper care. Silk and velvet bow ties should never be machine washed or submerged in water. For minor spills, spot clean immediately with a damp cloth using a gentle dabbing motion. For significant stains, consult a professional dry cleaner. To preserve its shape and fabric integrity, always untie your bow tie after wearing. Store it flat or gently rolled in a drawer, away from direct sunlight.


